This post may contain affiliate links. Please read our disclosure policy.
Learn how to make an easy restaurant-style ultra-smooth hummus. This recipe uses canned chips, garlic, tahini, and olive. And the secret to making smooth hummus is one simple technique!

I finally made an ultra-smooth and creamy hummus.
This is certainly not the first recipe of it’s kind. But this one is my all-time favorite. For me, hummus has to be creamy, scoopable with a pita chip and has the perfect amount of seasonings. A harmonious bite through and through. This recipe is one that I’ve worked extra hard on because, right now, you can’t always find your favorite convenience foods at the grocery store. I’ll show you how you can easily make homemade hummus, way better than the store-bought stuff.
But first, have you noticed how store-bought and restaurant-style hummus are very different? I find the store-bought stuff just tastes like thick chickpea paste without too much flavor.
My recipe uses five simple ingredients (if you don’t count the salt and oil), most of which you probably already have at home. Except for one ingredient, most of these are pantry staples. I’ve shared a link below so you can order it straight to your door and then make what I call the best hummus of all time.
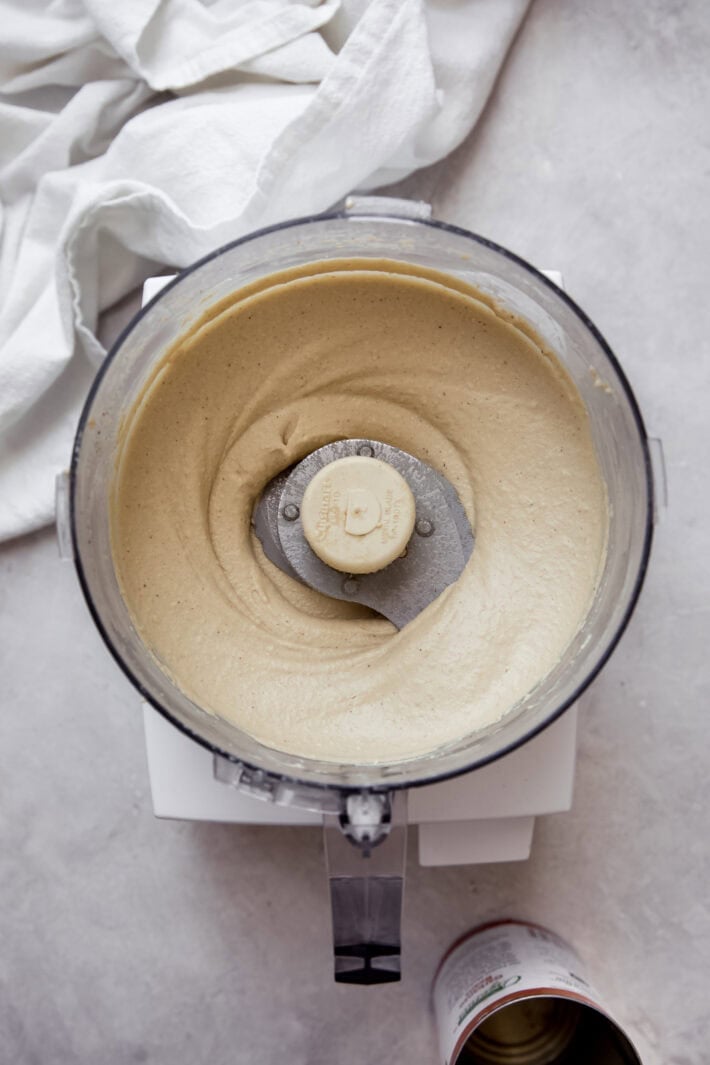
The main difference is that this recipe employs a simple technique before we process it into a dip. And as a result, we are left with the smooth garbanzo bean dip that’s perfect for serving with pita chips for a movie night snack or over your shawarma bowl for dinner!
Hummus is the ideal recipe to make if you stocked up on canned chickpeas with the current situation we have going on. With just a simple food processor, you can make hummus in around 20 minutes!
I have made this hummus several times and it is always smooth and delicious.
What is hummus?
Hummus is a creamy dip often made in Middle Eastern or sometimes Mediterranean cuisine. It’s made from cooked chickpeas (or garbanzo beans) and often includes tahini paste, lemon juice, and garlic for flavor.

Ingredients for Hummus
- Garbanzo bean: Or often called chickpeas. You’ll need one can for a single batch of this recipe. And don’t forget to save the liquid that the beans come packed it, it’s called aquafaba. It’s the perfect blending liquid, and we’ll use it later.
- Baking soda: Baking soda is the crucial ingredient in making smooth hummus, do not skip this ingredient!
- Garlic: I use one giant clove of garlic here and find it’s perfect for us. If you anticipate leftovers, I would suggest using a little less garlic than you usually like, as it does tend to spice up the hummus quite a bit as it sits. We love garlic (and I use a ton in my recipes, always), but even I use just 1-2 cloves!
- Tahini paste: Tahini paste is the backbone of any excellent hummus recipe. Tahini is made from toasting and grounding up sesame seeds and is used in tons of Middle Eastern cuisines. It’s also a key ingredient when you’re making baba ganoush.
- Lemon juice: I use about three tablespoons of lemon juice and find that to be the perfect sweet spot of us, it’s bright and zingy without being over-powering. Try it this way first, and you can always add more lemon juice (and cut back another tablespoon on the aquafaba )
- Olive oil: use a good quality extra virgin olive oil here, if possible. Since we aren’t cooking with it, the olive oil flavor does shine through.
- Seasonings: I season with kosher salt and ground cumin. The cumin is an optional ingredient, but it does add a ton of smoky flavor, just the way your favorite middle eastern restaurant makes it!
What is the secret to the best from-scratch hummus?
The secret to making the best hummus is using a teaspoon of baking soda and boiling the chickpeas for a short 10 minutes once you drain them from the can. Then, blend them with all the other ingredients. I know what you’re thinking; ‘those chickpeas are already cooked.’
Yes, they are. I grew up watching my mom cook dried chickpeas with a hint of baking soda, and not until recently did I realize that the reason her hummus was always so much smoother than mine was that she always boils chickpeas with baking soda.
So I played around with using a can of chickpeas and adding another 10 minutes of boiling time, and it worked even better than I had initially hoped.
Recipe Variations
- Toasted sesame: replace one tablespoon of the olive oil with toasted sesame oil and sprinkle with toasted sesame seeds to finish once plated
- Roasted red pepper: If you have half a jar of roasted red pepper, drain and add the red peppers in with the chickpeas when you’re blending to give it a unique flavor
- Spicy: Add 1-2 tablespoons of chili garlic sauce to add a spicy kick
- Kalamata olive: Add a ½ cup of sliced Kalamata olives in with the tahini, lemon juice, and garlic to blend into a smooth paste
- Pesto: replace 1-2 tablespoons of the olive oil with basil pesto and sprinkle with freshly chopped basil before serving
- Chipotle: Add 1-2 chipotle peppers in adobo sauce when you’re blending the chickpeas. You can even add a bit of that adobo sauce.
- Add sumac: Swap out the cumin or add a simple of sumac as a garnish
- Add Greek salad on top: When you’re garnishing the hummus, add a homemade marinated feta greek salad on top that you can then serve as a dip!
Serving Suggestions
- On its own with pita crisps or pita bread
- with carrots, celery, and sweet peppers as an appetizer
- Seven-layer chickpea shawarma dip
- As a sauce for 20-minute Greek Gyros
- Beef shawarma bowls (I used baba ganoush in the pictures, but hummus would be equally delicious!)
- Serve alongside Persian chicken kebabs with pitas
- Serve alongside Greek Keftedes
- As a sauce for instant pot beef shawarmas
- As a sauce for Kofta pita sandwiches
- As a base for chicken gyros with French fries (you can omit the tzatziki!)

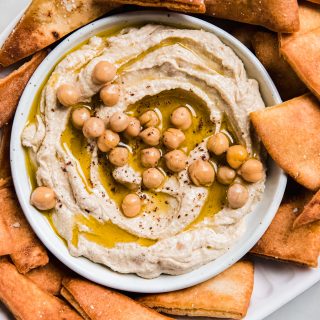
The Best Extra Smooth Hummus (Way Better Than Store Bought)
Ingredients
- 1 (14.5-ounce) can chickpeas reserve 4 tbsps of liquid
- 1 teaspoon baking soda
- 1 large clove of garlic or two!
- ¼ cup tahini paste
- 3 tablespoons lemon juice
- 3 tablespoons olive oil
- ½ teaspoon kosher salt
- ½ teaspoon ground cumin optional
- Pita Chips for serving
Instructions
- BOIL: Add the drained chickpeas to a saucepan and cover with 3 cups of water. Add the baking soda and bring the chickpeas to a boil over high heat. Once boiling, lower the heat to medium-low and allow the chickpeas to simmer for 10-12 minutes until you see the chickpea peels floating to the top. If fine if the chickpeas get super soft, we're processing them anyway!
- DRAIN: Drain the chickpeas in a colander or mesh strainer and remove all the peels that you can easily take off the chickpeas. You could also just rub the chickpeas in the colander to help loosen up more peels and remove them. Rinse the chickpeas under cold running water and continue to remove any peels that may have released from the chickpeas.
- PROCESS: Add the garlic, tahini, and lemon juice to a food processor and process until completely smooth, this will take 1-2 minutes. Then, add ½ of the chickpeas, along with the olive oil, salt, ground cumin, and 2 tablespoons of the chickpea liquid. Process until it forms a smooth paste. Then, add the remaining chickpeas and 1 tablespoon of water or chickpea liquid (see notes). Continue to process in the food processor until smooth. If you feel the hummus is still thick, you can add the one remaining tablespoon of the chickpea liquid (aquafaba) and process it for another 10 seconds. Serve the hummus with pita chips or pita bread.
Notes
Nutrition
Nutrition information is automatically calculated, so should only be used as an approximation.
Like This? Leave a comment & rating below!


Has anyone tried to make chocolate hummus using this as a base? This hummus is fabulous, and I don’t buy store-made hummus now that I have this great recipe. However, I do enjoy chocolate hummus from time to time and would like to learn how to tweak this recipe to create it. Any suggestions would be welcome!
I made this in a Vitamix blender, so I did not worry about the skins, kept them and the hummus came out smooth as butter! I used a fat, double-size garlic, and then added another garlic at the end, So I probably had a total of four small to regular size garlics, and the hummus came out PERFECT! I did need all the liquid plus another tablespoon or two. Thanks for a great recipe!
WOW! Absolutely delicious!! One thing I came to the comments looking for were tips on speeding up the skin removal process. What I ended up doing, for anyone else looking for the same, was to spin the beans around in a small metal colander then dump into a bowl and fill the bowl with cold water. Some of the skins will have come off in the colander so I’d rinse that then repeat all the while doing some hand work along the way but much less tedious than peeling all by hand. Someone called the process meditative and I’m happy for them but I’d rather meditate out in nature after having some bites of hummus I made with some expedience. This is hands down the creamist hummus recipe I have ever made.
This is a perfect hummus recipe. I’ve tried it with both dried and canned chickpeas and both ways have been terrific although I did have to adjust the salt when using the full-sodium canned chickpeas. I also found that I didn’t need to remove all of the skins with the canned version. I cooked the heck out of them on the stove and it blended beautifully skins and all. I think the baking soda weakened the integrity of the skins. I love that cooking is all chemistry. I also appreciated the tip of letting the garlic sit in the lemon juice before adding. This will be my go-to recipe from now on – sorry M Bittman.
Perfection. I love silky smooth hummus and really hate the chunky stuff. Thank you
Sooo damn good, I used cannalleni bean, I was out of garbanzo beans
Super recipe! Thanks!
How much time does it take approximately in the food processor until smooth?
This is with the chickpeas skins yeah..?
And btw, we usually have our hummus with piping hot naan
After years of making gritty hummus at home, I have to say – this was a complete game-changer, thank you!
Like others commented, you don’t need to remove the skins to get the promised super-creamy texture, just simmer the chickpeas with the baking soda as directed and keep them in. (Life’s too short to deal with picky chickpea skins!)
I loved that this recipe significantly less olive oil than other recipes too – with even better flavor. Well done!
This is so good even my picky 11 year old tried it and said he would eat it in his lunch with pita chips. As he was walking away, he turned around and said, “Actually, can I have some right now?”. I am so grateful!! I also have to attend a bunch of meetings tomorrow with a guy who is very high up in my company, so I’m going to pack this as a snack to offer him in case it’s late before we can get lunch. I fully expect it will impress him and probably lead to a big promotion, lol, so thanks again!
How far in advance can you make this and how long will it last (if any leftover) in the fridge?
I’m happy 🙂 I had the most delicious hummus brand in Australia but have moved home to New Zealand and the store brands all have garlic etc so knew I needed to make my own. Tried one of Jamie’s, was a disaster. Found this and I’m really happy. It’s smooth and creamy and delicious. I leave out the lemon and garlic. Also didn’t seperate skins really as was soft after boiling. I make weekly and double the batch. Thanks 🙂
I have made this hummus several times and it is always smooth and delicious.
Thank you for this. I’ve been making homemade hummus for many years now, and this is by far the best I’ve made ☺️
I’m using dried chickpeas that have been soaked. Should I still add the baking soda when I begin the cooking process? Thank you, Kathy
Hi Kathy! Yes, you’ll still want to use the baking soda if you’re boiling the chickpeas from scratch. Hope you enjoy the hummus!
This really did work, very tasty, very smooth hummus. Great tip using the baking soda. My husband says its better than some bought. I may be tweeking the lemon juice/oil quantities but that’s personal taste.
I make this a least once a week, it is that good. Have taken to doubling the recipe so not only do I have enough for pita dipping initially, but enough to use as a sandwich spread or more dunking throughout the week. I use more salt and cumin than called for and sprinkle the top with cayenne. I even love peeling the skins off the chickpeas, it’s meditative.
I always liked the taste of my homemade hummus but it was never smooth enough for me! The boiling with bicarbonate of soda (baking soda) was a revelation. Smoothest hummus ever. Thank you so much x
Hi Julie! I’m so glad to hear you enjoyed that tip! Appreciate you circling back to leave a review 🙂
My only complaint is that its TOO good! Can’t leave it alone, don’t want to finish he remaining bit of commercial hummus I have in the fridge! So easy to make. I didn’t remove the peels, they were pretty mushy. My food processor took care of it. The hummus was smooth as can be and so delicious! Thanks!
Bahaha – you scared me there for a second, Karen! So happy to hear you’ve ditched your store-bought one for this 🙂
brilliant tip to boil the chickpeas in baking soda!! this is the smoothest hummus i have ever made and as a massive smooth-hummus fan, i LOVE it!
So glad to hear you gave this recipe a go, Lauren! Thank you for circling back to leave a comment 🙂