This post may contain affiliate links. Please read our disclosure policy.
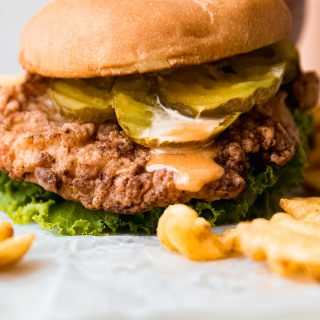
Pickle-Brined Crispy Chicken Sandwiches are a Southern classic! These fried chicken sandwiches start with extra crispy chicken between soft brioche buns loaded with sweet and tangy homemade Chick-fil-A sauce, and extra pickles! Simple and so delicious!

If there’s anything on this planet that is ‘worth the calories’, it’s a homemade spicy chicken sandwich.
We start by brining chicken breasts, tenders, or thighs in a buttermilk pickle juice combo overnight. This allows the flavor to really get all the way into each bite. And then we’ll dredge them in seasoned flour and fry them up until they’re extra crispy.
I know, the internet is filled with chicken sandwich recipes. And if you’re not in the mood to make one, fast food chains like Burger King, McDonald’s, Wendy’s, and KFC are typically right around the corner. But trust me when I say this, homemade is so much better. The hot and spicy honey mustard sauce gives this such an amazing flavor. Paired with a steamed potato bun, crisp lettuce, dill pickles, the taste is phenomenal! This isn’t your average grab-and-go Chick-fil-A crispy chicken sandwich either! It’s one that’s treated with lots of love and care and enjoyed on hot summer evenings on the patio with friends or family.
As I said, it’s actually worth every. single. calorie.
These chicken sandwiches are amazing. We loved the sauce, and the level of heat these chicken sandwiches had. We cooked them exactly as instructed. The crust was crispy and adhered to the chicken with no problem. I highly recommend these.
What’s a crispy chicken sandwich?
A tender piece of boneless, skinless chicken that’s dredged in a flour mixture that often contains a variety of seasonings and spices. The flour coating adheres to the chicken, which is often brined in buttermilk or other liquids, creating a crumbly crust. When you fry the chicken, the coating becomes crispy and crunchy! Then, you pop this into a soft bun and top it with your favorite toppings.
Ingredients to make a crispy chicken sandwich
- Chicken: you have a few different options here, you could use boneless, skinless chicken breasts, or even boneless skinless chicken thighs. This recipe uses 1 pound of chicken (or two hefty chicken breasts) that were cut down the middle and pounded using a meat mallet into an even thickness. This allows the chicken breasts to fry up evenly in the oil so that each bit is perfect.
- buttermilk: because of its low pH, buttermilk helps tenderize the chicken without toughening it. I usually have buttermilk cubes in the freezer – I freeze leftovers in cubes so I have some when I need them. Or I use ⅓ cup of buttermilk powder with ¾ cup of water for this recipe, instead of the amount written on the package. I find it tastes much better this way!
- pickle juice: used as a brining liquid that helps tenderize and flavor the chicken. I typically use the juice of dill pickles, but you can use whatever you like here. We’ll add the chicken to a shallow dish and them let it soak in the pickle and buttermilk brine so that it gets nice and tender!
- sugar: sugar is used both in the brining mixture as well as the crunchy coating to create a well-balanced flavor
- all-purpose flour: is the base for our dredging mixture. I use a 50:50 mix of AP flour and cornstarch to add a better crunch to the chicken. What you won’t find in my recipe is panko or breadcrumbs! I find that these ingredients absorb a lot of oil during frying and make the sandwich a bit greasy!
- cornstarch: used 50:50 along with the flour to make the chicken breasts extra crispy.
- seasonings: we use a combination of chili powder, garlic powder, onion powder, salt, black pepper, and cayenne pepper to create an ultra-flavorful flour coating and brining liquid. If you aren’t a fan of spice, swap the cayenne for paprika.
- oil for frying: You want to use high-heat oil for frying, such as peanut oil. Using oil that has a high smoke point and a neutral flavor is essential. If you didn’t want to use peanut oil, you could also use avocado, canola or vegetable oil.

How to make a crispy chicken sandwich
- Brine the chicken: Combine the ingredients for the pickle brine in a glass measuring cup. Add the chicken to a glass dish and pour the brining mixture over the chicken. Cover and refrigerate for at least 1 hour and up to 18 hours in advance.
- Dredge the chicken: Combine the flour, cornstarch, and seasonings in another pie dish and whisk until evenly combined. Remove the chicken from the brining liquid, but don’t discard it! Add a tablespoon of the brining liquid to the flour and whisk to combine. The crumbly texture will add extra crunch to the chicken! Dredge each piece of chicken in the flour mixture and place on a clean surface.
- Let it hang out: Allow the chicken to sit for at least 10 minutes so that the flour mixture absorbs all the liquid. This will create a more crispy chicken sandwich!
- Fry the chicken: Heat the oil in a large cast-iron skillet and allow for it to heat up to 350ºF. You can check the temperature by clipping a thermometer to the side of the skillet so you can monitor it or frequently testing with a digital thermometer. Once the oil is hot, place the chicken in the skillet in batches and allow for it to fry for roughly 2-3 minutes per side. Remove the chicken to a wire rack and allow the chicken to rest for 5-10 minutes, you can fry the second batch while you wait, so you aren’t wasting time. Then, add the chicken back to the skillet and fry a second time until the chicken is crispy and cooked through to 165ºF.
- Assemble the sandwich: Add a layer of mayo or homemade sauce (recipe below) to toasted buns, with sliced cheese, thinly sliced onions, romaine lettuce, and pickles! Or you could go the slaw route (which is how the Southerners do it!)
Toppings suggestions
- homemade coleslaw (a Southern classic!)
- pickles (you could even use fried pickles instead (!!!)
- homemade sweet and tangy sauce (recipe below)
- thinly sliced sweet onions
- romaine lettuce
- sliced cheese
- beefsteak tomato slices
Homemade Chick-Fil-A sauce
- 2 tablespoons honey
- 2 tablespoons bbq sauce
- 1 tablespoon yellow mustard
- ⅓ cup mayonnaise
- ½-1 tablespoon sriracha (omit for less heat)
Recipe Tips
- Add a tablespoon of the buttermilk pickle brine to the flour mixture. That creates flakey, crispy, crunchy bits that adhere to the surface of that chicken that add an extra crunch!
- Once the chicken breasts are coated in the flour mixture, allow them to sit on a wire rack or a baking sheet for 10 minutes. When the flour mixture dries onto the chicken, it fries up more crispy and crunchy!
- Lay the chicken away from you when you’re adding it to the hot oil so that if it splatters, it splatters away from you.
- Get good bread! You can use whatever kind of buns you have on hand or what you usually prefer! But here are a few suggestions: potato buns, brioche buns, kaiser rolls, sesame hamburger buns, or Texas toast.
If you like this recipe, you might also like:
- Crispy Chicken Salad with Sriracha Honey BBQ Dressing
- Vietnamese Chicken Sandwich
- Best Homemade Sloppy Joes
- Chicken Gyros with French Fries
- Greek Gyros with Tzatziki

Pickle-Brined Crispy Chicken Sandwich
Ingredients
Brining:
- 1 lb. boneless, skinless chicken breasts cut into 4 pieces (or 4 bl,sl thighs)
- ¾ cup buttermilk
- ⅓ cup pickle juice
- 1 teaspoon kosher salt
- 1 teaspoon sugar
- 1 teaspoon garlic powder
- ½ teaspoon black pepper
- ¼ teaspoon cayenne pepper
Breading:
- ½ cup all purpose flour
- ½ cup cornstarch
- 1 tablespoon powdered sugar
- ½ teaspoon garlic powder
- ½ teaspoon kosher salt
- ¼ teaspoon black pepper
- ¼ teaspoon cayenne pepper
- ¼ teaspoon onion powder
Serving:
- oil for frying
- 4 Buns
- Toppings pickles, lettuce, cheese, sauce (in notes) and/or coleslaw
Instructions
- BRINE: Combine the ingredients for the brine in a shallow bowl. Add the chicken and make sure it’s all covered in the marinade. Cover with wrap or a lid and refrigerator for 1-18 hours.
- SET IT UP: Remove chicken from the fridge 30 minutes before frying. Combine the breading ingredients in a shallow dish and whisk. Add 1 tablespoon of the brining liquid, this helps create a crumbly crust.
- BREADING: Remove chicken from brine, dripping off the excess before dredging it in the flour mixture. Press down to ensure the coating adheres. Gently lift the chicken pieces and shake to dust off excess. Place on a baking sheet and allow the coatings to dry, this creates a crispier chicken! Repeat with the remaining chicken.
- FRY: Heat a medium saucepan over medium heat with 3-4 inches of oil to 350ºF. Gently lower the chicken into the oil in batches and fry. For 5-7 minutes, flipping around the halfway mark to cook the chicken all the way through. Remove to a baking sheet with a wire rack and immediately sprinkle with some kosher salt.
- ASSEMBLE: Toast buns if desired top with prepared chicken, coleslaw, pickles, lettuce and or sauce (in notes.)
Notes
- Marinade: keep in mind that most of the flavor comes from the marinade. The longer the chicken sits in it, the more flavorful it will be. Plan ahead on this one if you can!
- To make the sauce: whisk together 2 tbsps honey, 2 tbsps bbq sauce, ⅓ cup mayonnaise, 1 tbsp yellow mustard, and ½-1 tbsp sriracha sauce in a small bowl and until smooth.
- feel free to omit the cayenne pepper from the breading and brining mixture if you prefer to keep this on the mild side!
Nutrition
Nutrition information is automatically calculated, so should only be used as an approximation.
Like This? Leave a comment & rating below!


Followed recipe and used avocado oil to make them somewhat healthy. They were the BOMB.
I used your recipe but measured with my heart- it turned out fantastic! Fresh milled spelt instead of all purpose, fried in tallow. The corn starch + resting made such a difference
Looks great! Chicken is marinating now. Only one question, can these be deep fried?
This is my go-to recipe for pan fried chicken! I’ve used it for sandwiches like this and chicken tenders. The chicken always stays juicy. This recipe is so much easier than the ones that have you dredging in flour, then egg, then breadcrumbs–and it’s so much more flavorful! I always make the dipping sauce as well.
I made this and it was a 2 thumbs up from the family. Our 9 year old son has become obsessed with chicken sandwiches. Each Friday he gets a chicken sandwhich from differnt places. He wanted to see which he liked the best. Weirdly it was Arby’s over KFC, Chick-fil-A, Bojangles, and Popeyes. We tried them at the other fast food places and non fast food places as well. Anyhow, I came across this recipe. He took one bite, chewed, swallowed, took another bite, chewed, swallowed, and then said “Mama, I change my mind, this is the best chicken sandwich I have ever ate”. Thank you!
These chicken sandwiches are amazing. We loved the sauce, and the level of heat these chicken sandwiches had. We cooked them exactly as instructed. The crust was crispy and adhered to the chicken with no problem. I highly recommend these. They are going into our rotation of recipes.
Thanks for a delicious recipe!
I will definitely try this recipe
This didn’t work for us. I followed the instructions, but most of the breading all came off. I feel like it could have used egg to keep the breading on. It also needed more spice. I doubled the pepper and cayenne, but it tasted mostly like cornstarch and flour. This might be good with a few adjustments, but isn’t there yet.
The marinade was wonderful! I made tenders and marinated them overnight. Didn’t care for the “breading” so much so next time I’ll just use breadcrumbs and Panko with some seasoning. Air fried them and served with the Chik-fil-A Sauce which we loved, adding an extra squirt of mustard and sriracha. Definitely a keeper for many uses!
Can this be made in the Air Fryer? ;
I haven’t made it in the air fryer before, but I think it could work! I would spray the chicken pieces with cooking spray and maybe only cook two pieces at a time (unless your air fryer is huge.) I’d cook it at 390ºF and flip it about halfway through.
We followed the recipe exact and it came out perfect! You can taste the pickle juice in the chicken. We marinated the fillets for 5 hrs. We used breast meat since thats what we had. Not dry at all. The breading stayed on fine for us. This was our first attempt at fried chicken sandwiches and we couldn’t be more thrilled with the results!
Amazing! So glad to hear you enjoyed these Shawna! Thank you for taking the time to stop by and leave a review 🙂
Looking so crispy. Will definitely try this delicious chicken on family gathering.
Happy to hear that, Mandy!
This looks so good! I’m printing the recipe out so I can try it! I will have to quadruple the recipe so there is enough for all 8 of us.
I’m so glad to hear you are interested in giving the crispy chicken sandwiches a try, Erica! I hope everyone you share them with enjoys them to the fullest!