This post may contain affiliate links. Please read our disclosure policy.
Learn how to make instant pot hummus. There’s no presoaking required for the beans. Almost everything is a pantry staple ingredient so you can whip up homemade hummus and customize it to your liking anytime!

INSTANT POTAMUS!
I can’t help that that’s the first thing that comes to mind every time I write the words ‘instant pot hummus.’
But it’s a lot more than just fun to say. It’s the perfect easy appetizer to throw together if you’re having guests over. Put out a platter of veggies, tortilla or pita chips and watch the crowd go wild. There’s something about whipping garbanzo beans with thaini and garlic that people just love.
Hummus made in the instant pot is smooth and creamy. I like hummus to be slightly tangy and made from scratch, and preferably with zero presoaking of the beans or any of that nonsense.
Can I just say that instant pot hummus is about to save you the big bucks? Store-bought hummus costs roughly $4 a container and runs out super quick around here. You can get almost four times that much hummus for about the same price if you make hummus in your instant pot.
Making instant pot hummus isn’t hard. All you need is dried garbanzo beans (or chickpeas), tahini, tons of garlic (or as little as you like), olive oil, lemon juice, ground cumin, and salt! Most of these are pantry staples. It’s easy to see why I prefer to make my own. Plus, this makes a ton of hummus and will easily last you a week in the refrigerator!
I love this recipe and use it frequently. The quantity of lemon and garlic gives ir a nice zest, and it’s relatively quick and easy to make with the Instant Pot and food processor.
Like a lot of people, we go through tons of hummus at home. I use it as a spread on lazy girl lunch sandwiches, as a dip for carrot sticks, serve it alongside my chicken gyros, instant pot beef shawarma, and even my grilled Persian chicken. See why I needed an instant pot hummus recipe to cut down on the amount of hummus we purchase!
Homemade hummus is lighter on the calories, has a bolder flavor, and is easier on the wallet! It’s something I often make to have on hand on the weekends so that we have something healthy to munch on for wild Saturday nights in front of the TV.
What is Hummus?
Hummus is a dip or spread made from boiled or cooked chickpeas that have been blended with olive oil, tahini, and lemon juice.
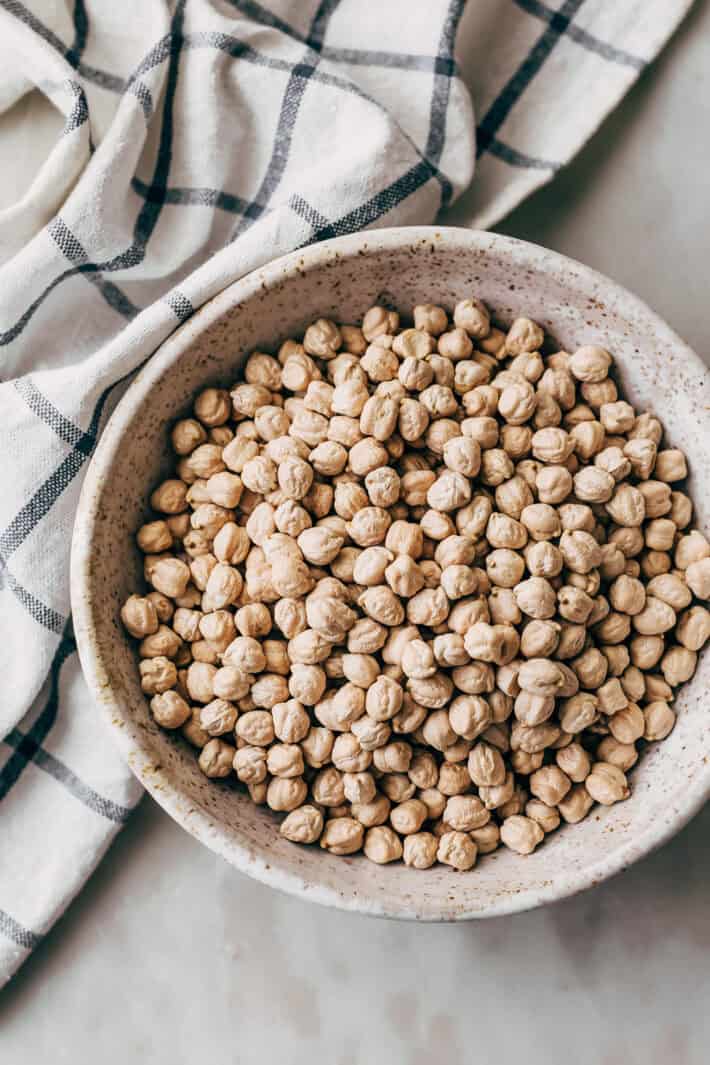
Cooking chickpeas
The good, scratch that, the great news is that even though we’re using dried beans for today’s recipe, there is no presoaking required! When you make instant pot hummus, all you need to do is toss the chickpeas in with the water and a couple of cloves of garlic and let it cook up until they’re super soft. The garlic is optional. But if you’re a fan, this will infuse some of that flavor into the chickpeas!
Regular chickpeas usually take about 25-27 minutes. Plus, 30 minutes of natural pressure release in the instant pot if you’re using them for salads or soups or stews. For hummus, I recommend cooking the garbanzo beans longer. This makes the hummus super smooth and creamy without having your food processor do all that work.
To cook chickpeas in the pressure cooker, all you need to do is rinse the chickpeas, add them to the instant pot along with water, and a couple cloves of garlic. Seal the valve and allow the beans to cook for 38-40 minutes on manual high pressure. If you’ve had the beans in your pantry for a while, they’ll take a little bit longer to cook than if you’ve just purchased beans recently.
How to make instant pot hummus
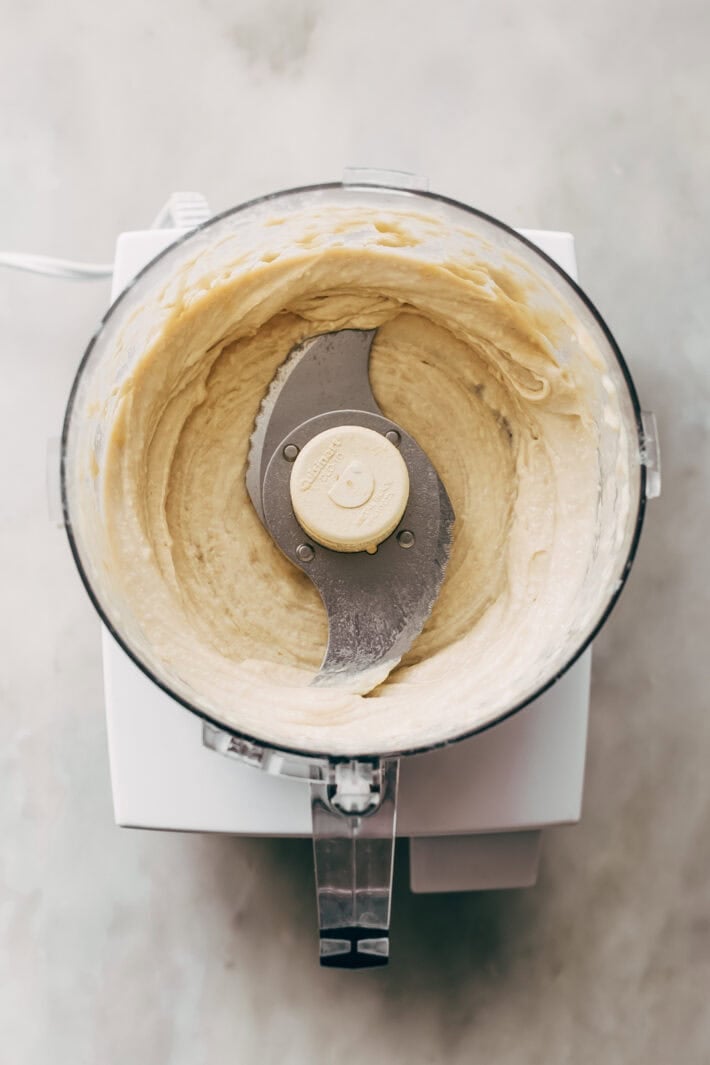
When the instant pot timer goes off, allow 30 minutes for natural pressure release. This is important because the chickpeas will continue to cook for a bit here. Before draining the beans, save 1 cup of the chickpea cooking liquid. We’ll use that when we make the hummus.
Recipe Tip
To make the hummus extra smooth, blend the garlic, tahini, and lemon juice first. Then add in the rest of the ingredients. Something magical happens when lemon juice and tahini get together in the food processor. This gives the tahini a chance to loosen up a bit and allows the garlic to disperse its flavor throughout.
Once the tahini is blended and airy, we’ll add the olive oil, chickpeas and the chickpea liquid in batches. Even if your food processor is large enough to hold everything in a single batch, I suggest adding in ½ of the olive oil, ½ the chickpeas, and one tablespoon of cooking liquid at a time.
You probably won’t end up using the entire cup of chickpea liquid. I used a total of 3 tablespoons of the chickpea liquid and went with a ½ cup of lemon juice. This made the hummus tangy and loose and it was perfect for our taste! We like our hummus a little thinner and tangier. If you cut back the lemon juice to ⅓ cup, you’ll need a little more of that cooking liquid to make up for it, so you may end up using closer to ½ a cup total or so.

Serving and storing leftovers
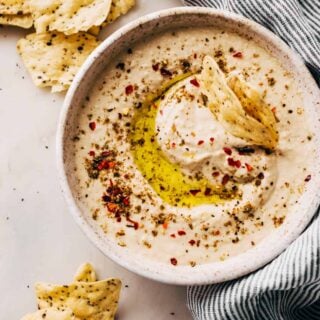
I like to allow the hummus to cool down a bit in the refrigerator before serving it. Warm hummus just isn’t my thing, but it’s good to go once you’ve blended it up. I like to drop dollops of hummus into my serving bowl. Drizzle it with olive oil. To finish it off, sprinkle on a generous sprinkle of za’atar, smoked paprika, or sumac. Hummus tastes better as it sits, so I suggest making this a day ahead of when you plan on serving it.
Leftover hummus can go into an airtight container and can be refrigerated for up to 7 days. I’ve tried freezing it before, and hummus can be frozen. But I do find that it does become a little bit looser once you defrost it. So if you plan on freezing some, make it a little thicker! Pop it into a freezer-safe, airtight container, and leave enough room for expansion! You can freeze the hummus for about 3-4 months.
And there you have it! No reason to go out and buy teeny tiny hummus containers when you can easily make instant pot hummus at home and customize it howeverrrrrr you like!

Instant Pot Hummus
Ingredients
Garbanzo Beans:
- 8 ounces dried garbanzo beans about 1¼ cup
- 6 cups water
- 2 cloves garlic optional
Hummus:
- ⅓ – ½ cup lemon juice
- ½ cup tahini paste
- 8-10 cloves minced garlic or more to taste
- ½ cup reserved chickpea water
- ⅓ – ½ cup olive oil
- 1 ¼ teaspoon kosher salt
- 1 teaspoon cumin powder
Instructions
- PRESSURE COOK: Add the beans, water, and whole garlic cloves to the instant pot. Cover and seal the vent. Set the instant pot on manual ‘high pressure’ for 38-40 minutes. When the timer goes off, allow the pressure to release naturally for 30 minutes. This is important because the chickpeas will continue to cook for a bit here. Reserve 1 cup of chickpea cooking water, then drain the beans; set aside.
- BLEND: Place the tahini paste, minced garlic, and 1/3 cup of lemon juice in a food processor and blend until everything is smooth and airy. Add half the chickpeas, 1 tablespoon of cooking liquid, and half the olive oil and continue to process until smooth. Add the salt, cumin powder, the remaining chickpeas, and olive oil. Process until the paste is smooth. Taste and adjust. If the hummus is still thick, add more lemon juice or another tablespoon of cooking liquid with the food processor running. Stop the machine scrape down the sides and continue to mix and add a tablespoon of cooking liquid at a time until it reaches your desired consistency. I used just 2 tablespoons because I went with a ½ cup of lemon juice. But this part is really up to you!
- Spoon the hummus into a bowl, drizzle with additional olive oil, and garnish with za’atar or smoked paprika. Sometimes I like to add caramelized onions to the top!
Notes
- If you plan to soak the garbanzo beans before cooking them, you’ll need to reduce the pressure cooking time to 25-27 minutes.
- Keep in mind that 38 minutes or pressure cooking works for new beans. If you’ve had yours in the pantry for a while, I suggest upping the time to 39-40 minutes.
- The garbanzo beans are going to be extra mushy when they’re done cooking so I don’t suggest doing a double batch of beans unless you plan on making more hummus with them.
Nutrition
Nutrition information is automatically calculated, so should only be used as an approximation.
Like This? Leave a comment & rating below!


Pretty garlicky! I followed the recipe exactly. I would reduce the garlic next time.
The BEST, really the best and Easiest Hummus recipe ever.