This post may contain affiliate links. Please read our disclosure policy.

Oh my gosh.
I did this thing this week. I hate when I do this thing.
This thing is like having a million and one tabs open in a browser and then accidentally hitting the ‘X’ button.
It’s been one of those weeks. You know the kind of week where you’re crawling, begging and pleading that it could be Friday, so that the most wonderful pair of days in the week could finally be here.
Okay, let’s be honest, it was a total d’oh moment. (Insert face palm here). But lets keep this between us? You’re thinking, but it’s only Tuesday, it couldn’t be that bad.
Biscuit meets scone in this delicious recipe! The perfect blend of both and a family favorite.
There are only a few things that can make this kind of bad, better – tons of dark chocolate and oodles of carbs. Do people even say ‘oodles’ anymore?
I think it’s safe to say that after all of that, a pick-me-up is necessary! Let’s talk the beautiful language of carbs and symphony of butter.
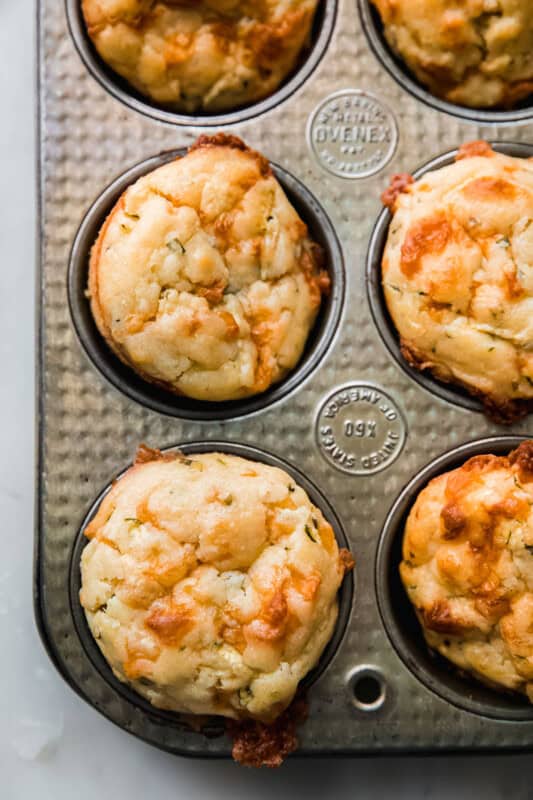
Let’s make cheddar chive scones


Cold butter is combined with flour, baking powder and soda, sugar, salt and some fresh cracked pepper. We’ll add in sour cream later to make them beautifully flakey and golden delicious.
Cold butter is broken down into the dry ingredients. I do this with a pastry cutter, though you could do use a potato masher or your hands. Don’t be afraid to get in there.
We’re going to add sour cream, an egg, and a couple of tablespoons of water. Then comes the good part, lots of chives and mountains of mild cheddar cheese. Once it starts to hold, we’re going to turn the mixture out onto a clean work surface.
Almost there. Just need to brush on a little egg wash and sprinkle with a little sea salt and some fresh cracked pepper. We’re minutes away from buttery bliss…

Don’t you just want to grab a bunch of cheddar chive scones, maybe one in each hand and shove them in your mouth like no one is watching? I won’t judge, go for it!

Garlic Cheddar and Chive Scones
Ingredients
- 2 cups all purpose flour
- 2 teaspoons granulated sugar
- 2 teaspoons baking powder
- ½ teaspoon baking soda
- 1 teaspoon granulated garlic or more
- ½ teaspoon sea salt + more for topping
- ¼ teaspoon fresh cracked pepper + more for topping
- ½ cup unsalted butter cold cut into cubes
- 1 large egg beaten
- 2 tablespoons water cold
- ½ cup sour cream cold
- ¼ cup chopped chive fresh
- 1 cup cheddar cheese shredded fine
- 1 egg lightly beaten for egg wash
Instructions
- Place a rack in the center of the oven and preheat oven to 400 degrees F.
- Line a baking sheet with parchment paper and set aside for later use.
- In a mixing bowl, sift together flour, baking powder, baking soda, salt, fresh cracked black pepper, sugar, and granulated garlic. Cut in butter using a pastry cutter or potato masher until butter breaks down into pea-sized pieces.
- In another bowl, combine egg, cold water, and sour cream. Beat lightly with a fork until just combined. Add to the flour mixture and stir until the dough is soft and begins to combine. Add the chive and cheddar cheese and dump mixture onto a clean surface to knead the dough. The dough should hold together in about 12-15 kneads.
- Roll or pat the dough out into 1-inch thickness. Cut into 2-inch rounds using a biscuit cutter. Continue to reshape and roll dough to create more biscuits with scraps.
- Place on prepared baking sheet, brush with egg wash and sprinkle with sea salt and fresh cracked black pepper. Bake for 16-20 minutes. Serve warm.
Nutrition
Nutrition information is automatically calculated, so should only be used as an approximation.
Like This? Leave a comment & rating below!


Thoroughly enjoyed this read. Thanks for sharing your knowledge.
Absolutely loves these. I used for the spices a 2T onion dip seasoning, fresh sage, fresh tyme and fresh rosemary. Turned out amazing
My scone turned very greasy and tough and I made sure all my measurements followed the recipe while tring not to overknead (dough was crumbly and hard to incorporate together) – but I didn’t freeze the scones before baking, so maybe the butter was already too warm and my oven might be running lower temp and more warm in the back than the front. I’ll try freezing the scones before baking next time and increasing the temp by 25-50F.
Hi Ruby! Based on the info you’ve provided, it definitely seems it may have indeed been one or both of the issues you mentioned. I think the adjustments you’re planning on making should help 🙂
This was delicious!!! Sub 1/2 tsp garlic powder because that’s what I had….so good! Thanks for the recipe 🙂 oh and I replaced 1/2 cup of flour with almond flour
Followed this recipe and it turned out soooo good. I froze my butter stick ahead of time and grated it into the dry ingredients and it worked out very well!
I was looking for a way to use up my garden chives. These turned out perfectly! Instead of an egg wash, I brushed them with melted butter at the end and sprinkled some coarse sea salt on top. Baked for 1 more minute. Delicious!
Greawt flavor, perfect texture. Thanks for the recipe!
There is no sugar in the list of ingredients, whereas step 3 mentions to add sugar…(?)
Biscuit meets scone in this delicious recipe! The perfect blend of both and a family favorite.
Great recipe, easy to follow and spot on with ingredients.
These are the best — cracked pepper on top perfect! I add extra cheese and chives, and double the recipe every time. Coworkers, friends, family love them!
The directions were easy to follow. I would suggest increasing the amount of cheese, chives and garlic used in the recipe to give it more flavor.
This was incredibly easy to make and they came out perfectly! My whole family loved them an they were so flaky and delicious!
I loved this recipe! Usually it is not easy to trust to recipes online. But I will be definitely making this one again!
Found this on Pinterest. Yum!!! So I haven’t ever x-ed out a bunch of tabs on my computer but my toddler has. Same difference ugh. I feel ya. Can’t wait to make your biscuit recipe.
Can you make this dough ahead of time (i.e. the night before) and then bake the next day? Thanks!
Unfortunately, I can’t suggest making this the night before. The baking soda and powder would be activated once you add the wet ingredients and the scones won’t rise properly the next day.
These came out picture perfect! They were fairly easy. I would add little more salt and pepper than called for.
These sound and look wonderful. Have you ever frozen them? If so, how do they hold up after they defrost?
I can’t say that I have! Would love to hear how it goes if you try freezing them.
I froze these for 30 minutes on a sheet pan before transferring to a ziplock and freezing overnight. I baked them as recommended from frozen. Great results, rose perfectly.
I made these a couple days ago and my family loved them! They are so flaky and delicious.